TABLE OF CONTENTS
- Overview
- Start with a demo Docker image
- Before you begin: choose your frontend system.
- Integration components
- Code example
- Create a service application (Stack Internal Community Enterprise only)
- The Backstage backend system
- Backend installation
- Frontend installation
- Example SearchPage.tsx code
- Set up the Stack Internal Community hub and question modal
- Install on the New Frontend System
- UI examples
- Run and authenticate the app
- Stack Overflow hub
- Troubleshooting and understanding errors
ADMIN PRIVILEGES REQUIRED
Overview
Backstage.io is a developer portal that streamlines software development by providing developers a common repository of code, libraries, documentation, and other resources. You can connect Backstage to your Stack Internal Community Basic, Business, or Enterprise site to display questions, tags, and users, as well as ask questions from your Backstage application.
With this Backstage integration, you can unlock your team's collective intelligence directly within backstage. Seamlessly integrate with Stack Internal Community to provide developers with instant access to your organization's knowledge hub. Empower them to find answers faster with:
- Centralized knowledge A dedicated Stack Internal Community HUB showcases the latest questions, trending tags, and top contributors.
- Contextual insights Embeddable UI components bring vital Stack Internal Community information directly into your Backstage environment.
- Frictionless collaboration Secure, streamlined OAuth authentication with PKCE ensures easy access.
- In-Context questioning Integration allows developers to ask questions and get help within their Backstage workflow (Stack Internal Community Business and Enterprise only).
- Unified search Integration surfaces valuable Stack Internal Community knowledge alongside internal documentation, streamlining information discovery.
Asking questions from Backstage is not available on the Basic plan.
Start with a demo Docker image
If you'd like to experiment with this integration without setting up a full Backstage instance, you can quickly test it with this pre-built Docker image:
https://hub.docker.com/r/stackoverflowdocker/stackoverflow-backstage-demo
This image runs a Backstage instance pre-configured with the latest Stack Internal Community plugins and demo setup. You just need to pass a few environment variables when starting the container to connect it to your Stack Internal Community site.
The Stack Internal Community Backstage Docker image doesn't currently support ARM64 architecture and isn't compatible with modern Macs (Apple Silicon). You can still set up and run the integration manually by following the plugin installation steps in this guide.
Required environment variables
Stack Internal Community Enterprise environment variables
| Variable | Description |
|---|---|
STACK_OVERFLOW_INSTANCE_URL |
The base URL of your Stack Internal Community site. |
STACK_OVERFLOW_API_ACCESS_TOKEN |
A read-only, no-expiry API access token for your Stack Internal Community site (used by the search collator to index questions in Backstage search). |
STACK_OVERFLOW_CLIENT_ID |
The OAuth Client ID from your Stack Internal Community application (required to enable secure question creation from within Backstage). This ClientID should have write access. |
STACK_OVERFLOW_REDIRECT_URI |
The redirect URI where Stack Internal Community should send users after OAuth authentication. Typically {app.baseUrl}/stack-overflow-teams. For local use, you can use a redirect service like http://redirectmeto.com/http://localhost:7007/stack-overflow-teams. |
Stack Internal Community Basic and Business environment variables
| Variable | Description |
|---|---|
STACK_OVERFLOW_TEAM_NAME |
The team name or team slug from your Stack Internal Community site. |
STACK_OVERFLOW_API_ACCESS_TOKEN |
A read-only, no-expiry Personal Access Token (PAT) for your Stack Internal Community site. Used for indexing content. |
Example Docker command
Once you have those values, you can launch the container by running the following commands.
Stack Internal Community Enterprise example Docker command
docker run -p 7007:7007 \
  -e STACK_OVERFLOW_INSTANCE_URL=https://your-site-url.stackenterprise.co \
  -e STACK_OVERFLOW_API_ACCESS_TOKEN='your-access-token' \
  -e STACK_OVERFLOW_CLIENT_ID=your-client-id \
  -e STACK_OVERFLOW_REDIRECT_URI=http://redirectmeto.com/http://localhost:7007/stack-overflow-teams \
  stackoverflowdocker/stackoverflow-backstage-demo:latest
Stack Internal Community Basic and Business example Docker command
docker run -p 7007:7007 \
  -e STACK_OVERFLOW_TEAM_NAME=https://your-site-url.stackenterprise.co \
  -e STACK_OVERFLOW_API_ACCESS_TOKEN='your-PAT-token' \
stackoverflowdocker/stackoverflow-backstage-demo:latest
Before you begin: choose your frontend system.
This guide supports both Backstage frontend systems. Your frontend system determines which installation steps you should follow.
-
New Frontend System (NFS): If your app uses
createAppfrom@backstage/frontend-defaultsand registers functionality through features and extensions, complete the shared backend setup in this guide, then skip the legacy frontend instructions and follow Install on the New Frontend System. -
Legacy frontend system: If your app uses
createAppfrom@backstage/app-defaultswith a<FlatRoutes>element tree, follow the guide as written, including the Frontend installation section.
The backend setup is the same for both systems. Only the frontend installation and configuration steps differ.
Integration components
The Backstage Stack Internal Community integration uses three plugins:
- Frontend Teams Plugin Provides the user interface elements that display Stack Internal Community content and functionality within your Backstage application.
- Backend Teams Plugin Handles API communication between Backstage and your Stack Internal Community site.
- Search Collator Plugin (Optional) Indexes all questions from your Stack Internal Community site, displaying search results directly within Backstage's search functionality.
This guide details the steps for setting up this integration.
You'll find it helpful to have a text file or other working document open to copy/paste information as you go through this process.
Code example
Our Github repository holds a Backstage Stack Internal Community integration already configured with the three plugins. If in doubt, use this example to help configure your own site.
Create a service application (Stack Internal Community Enterprise only)
To connect your Stack Internal Community Enterprise site to the Backstage integration, the best approach is for a Stack Internal Community administrator to create a service application. Learn more about API applications and Stack Internal Community service applications in the Stack Internal Community API v3 article.
Other users will see your Backstage service application, so be sure to give it a descriptive name (such as "Backstage"). For the service application domain, specify the domain of your Backstage site.
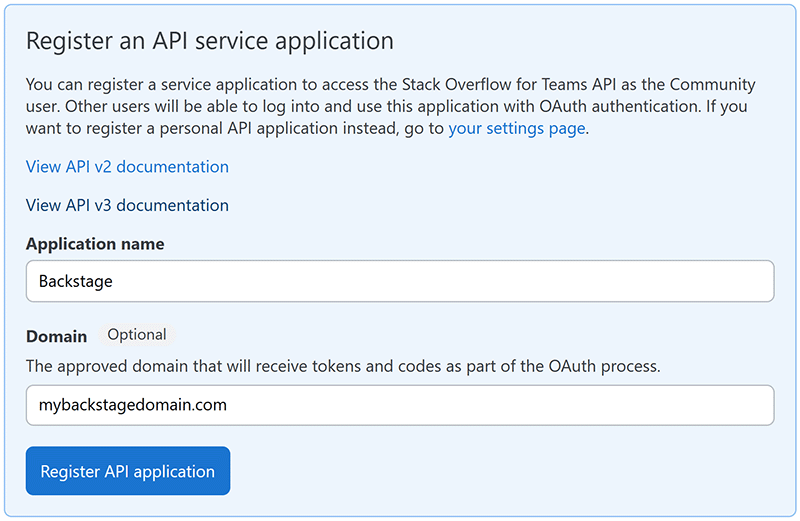
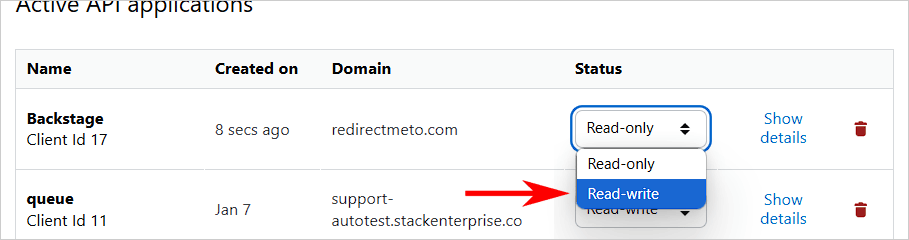
Once you've created the service application, refresh the page, change its Status to read-write, and click Confirm. Backstage will need the client_id, so be sure to save it to your working document.
If you plan to use the optional search collator plugin, you'll need an access token. Generate an access token by following the instructions in the Secure API Token Generation with OAuth and PKCE article. The secure token doesn't require write access, but we recommend enabling the no_expiry scope. Copy this token and save it to your working document.
The Backstage backend system
Backstage made changes to how the framework's backend system works with their v1.31.0 release. The instructions in this article assume you're using this New Backend System. You can migrate to the new backend system by following the Migrating your Backend to the New Backend System article.
You can use this integration with the older backend system, but these instructions will not apply. Instead, start by completing the Getting Started with Search guide from Backstage. Then follow the instructions in this Stack Overflow search collator GitHub repository.
The following instructions require the new Backstage backend system.
Backend installation
-
Add the Stack Internal Community Backend plugin and collator plugin as dependencies in your Backstage application.
From your Backstage root directory run:
yarn --cwd packages/backend add backstage-plugin-stack-overflow-teams-backend
yarn –cwd packages/backend add backstage-stack-overflow-teams-collator
This will add the plugins to the backend of the application.
-
Import the plugins.
Edit
packages/backend/src/index.tsand add the Teams Backend plugin and collator:backend.add(import('backstage-plugin-stack-overflow-teams-backend')); backend.add(import('backstage-stack-overflow-teams-collator'));You can find an example
index.tsfile in our Github repository. -
Configure the Backstage application with your Stack Internal Community API credentials.
For security, you shouldn't hard-code sensitive information (such as passwords or access tokens) into your application. Instead, you should store these in the environment and pass them to your application at runtime. How you'll accomplish this depends on your application and environment configuration. What follows is an example using the dotenv library to safely store and pass credentials.
Install dotenv
Run the following command to add the dotenv library to your backend:yarn --cwd packages/backend add dotenvConfigure dotenv
Edit thepackages/backend/src/index.tsfile to load the.envvariables into the application. Add the following lines of code:import dotenv from 'dotenv'; // Import the dotenv module dotenv.config(); // Load environment variables from the .env file into process.envCreate and configure the
.envfile
Create a new.envfile in thepackages/backendfolder. Define your environment variables in that file as follows.Stack Internal Community Enterprise .env file
STACK_OVERFLOW_INSTANCE_URL=your_site_url
STACK_OVERFLOW_API_ACCESS_TOKEN=your_access_token
STACK_OVERFLOW_CLIENT_ID=your_clientid
Stack Internal Community Basic and Business .env file
STACK_OVERFLOW_TEAM_NAME=team_slug
STACK_OVERFLOW_API_ACCESS_TOKEN=your_PAT
Ensure git doesn't upload
.env
Add.envto your.gitignorefile to prevent git from pushing it to the server:# Environment Variables .envLoad environment variables
Yourapp-config.yamlshould contain the following lines.Stack Internal Community Enterprise app-config.yaml file
  stackoverflow:
    baseUrl: ${STACK_OVERFLOW_INSTANCE_URL}
    teamName: ${STACK_OVERFLOW_TEAM_NAME} // optional
    apiAccessToken: ${STACK_OVERFLOW_API_ACCESS_TOKEN}
    client_id: ${STACK_OVERFLOW_CLIENT_ID}
    redirect_uri: ${STACK_OVERFLOW_REDIRECT_URI} // this should navigate to /stack-overflow-teams in your Backstage site
Stack Internal Community Basic and Business app-config.yaml file
stackoverflow:
teamName: ${STACK_OVERFLOW_TEAM_NAME}
apiAccessToken: ${STACK_OVERFLOW_API_ACCESS_TOKEN}
You can find an example app-config.yaml file in our Github repository.
Frontend installation
Set up search
Install the frontend plugin to use the integration functionality and format the indexed questions. As a prerequisite, you'll need to have your SearchPage.tsx file ready for modifications. For more information, read the Backstage Getting Started with Search guide.
In this example, we'll obtain the indexed search results and render them conditionally.
If you created your application by using npx @backstage/create-app, you'll already have a search page defined at packages/app/src/components/search. You can simply edit that file.
First, install the frontend Stack Internal Community plugin. Run:
yarn --cwd packages/app add backstage-plugin-stack-overflow-teams
Edit packages/app/src/components/search/SearchPage.tsx.
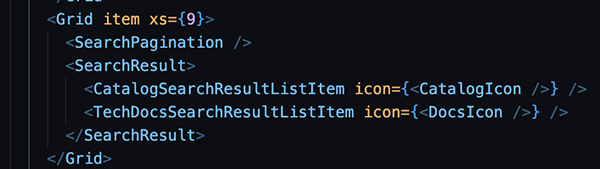
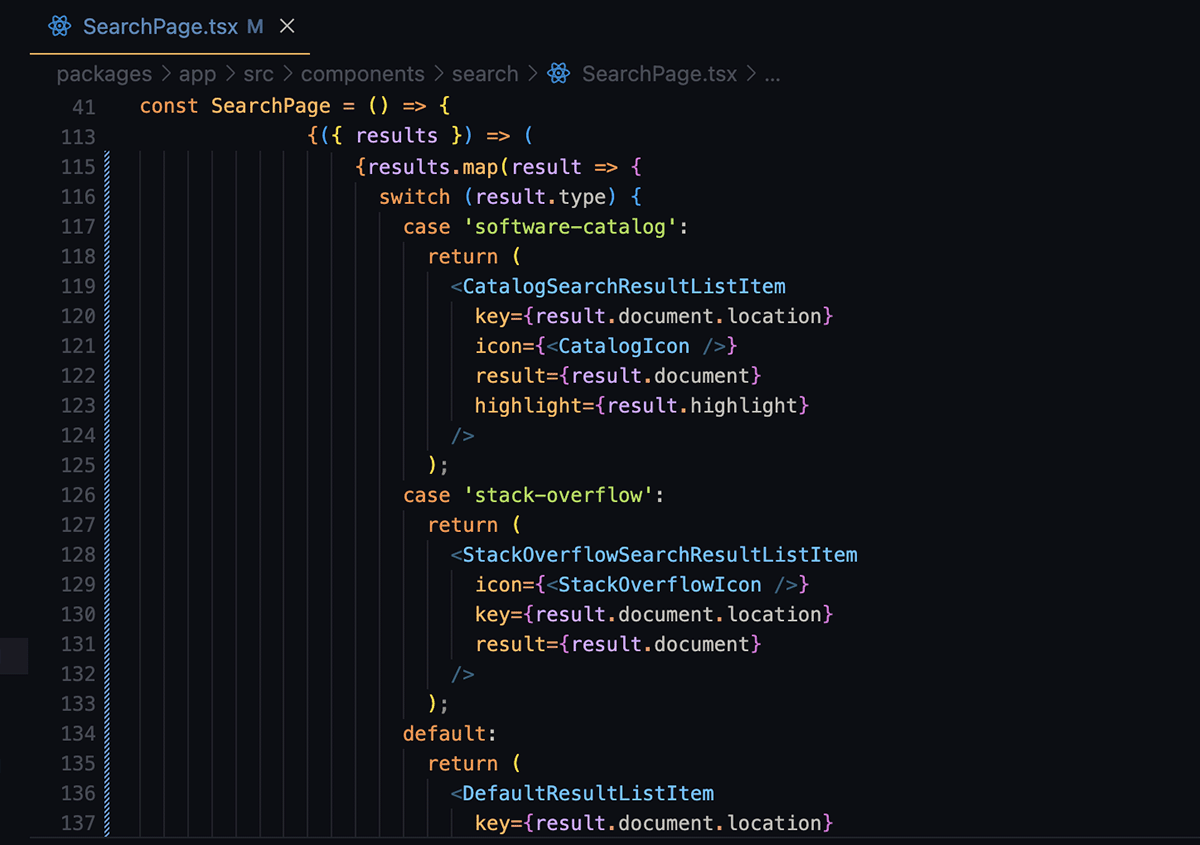
By default, SearchPage.tsx displays the search results without conditional formatting. You'll modify this to let the type of returned search results control how the search results appear.
Locate the following section in the existing <SearchResult><SearchResult/> code:
Replace this code with the snippet found in the Backstage Customizing Search documentation as below:
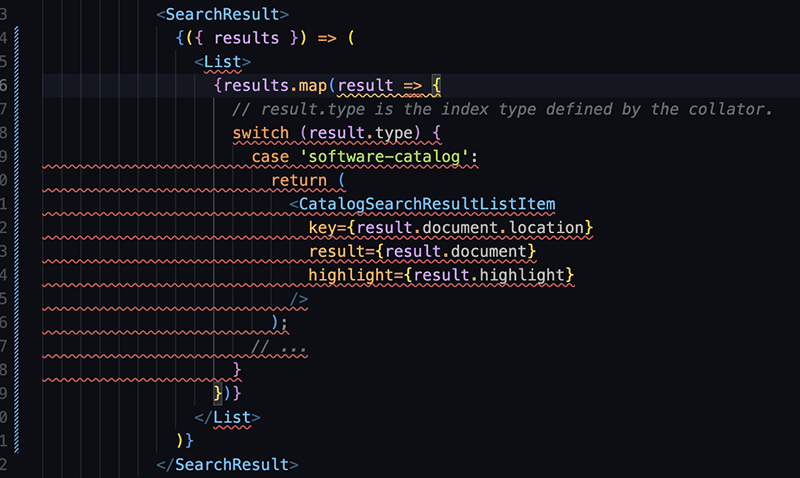
Disregard the error indicators—you'll fix them in the following steps.
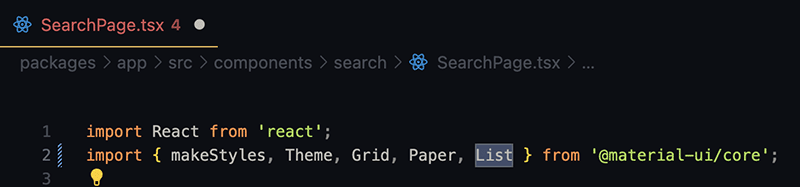
- Import the
<List/>component from the Material UI library by adding it to the@material-ui/coreimport array:
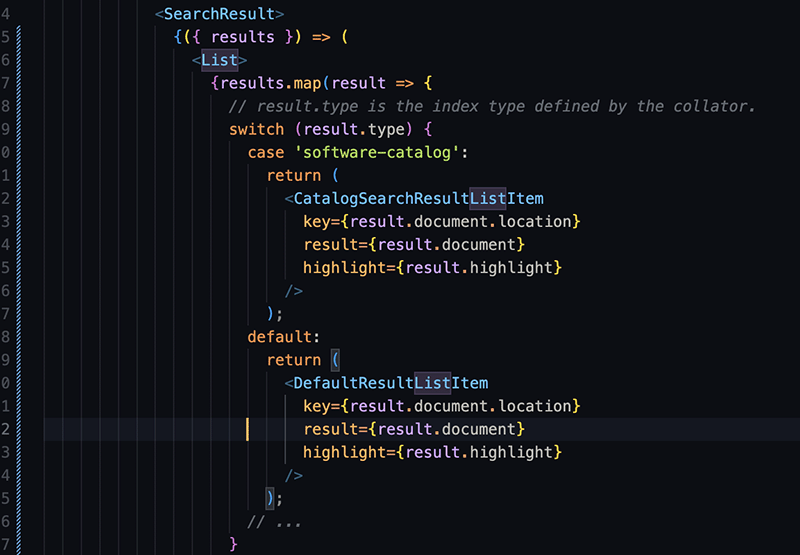
- Add a default case which uses Backstage's
<DefaultResultListItem/>component:
default:
  return (
    <DefaultResultListItem
      key={result.document.location}
      result={result.document}
      highlight={result.highlight}
    />
  );
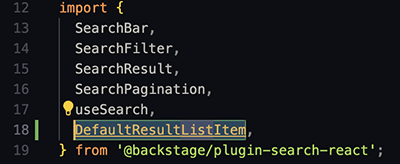
- Import the
<DefaultResultListItem/>component:
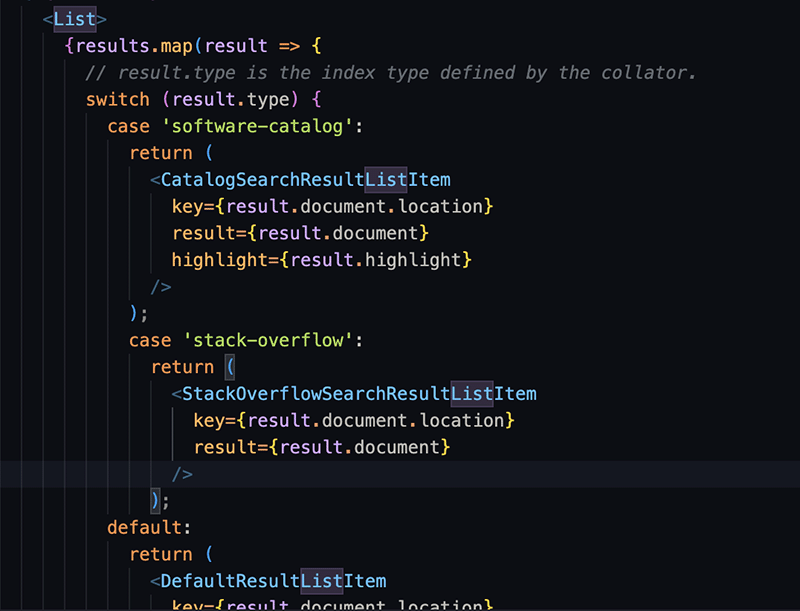
- Add the StackOverflow case to conditionally render the
<StackOverflowSearchResultListItem />component from the frontend plugin we installed:
case 'stack-overflow':
  return (
    <StackOverflowSearchResultListItem
      key={result.document.location}
      result={result.document}
      highlight={result.highlight}
    />
  );
- Import the list item component from
@backstage-plugin-stack-overflow-teams:

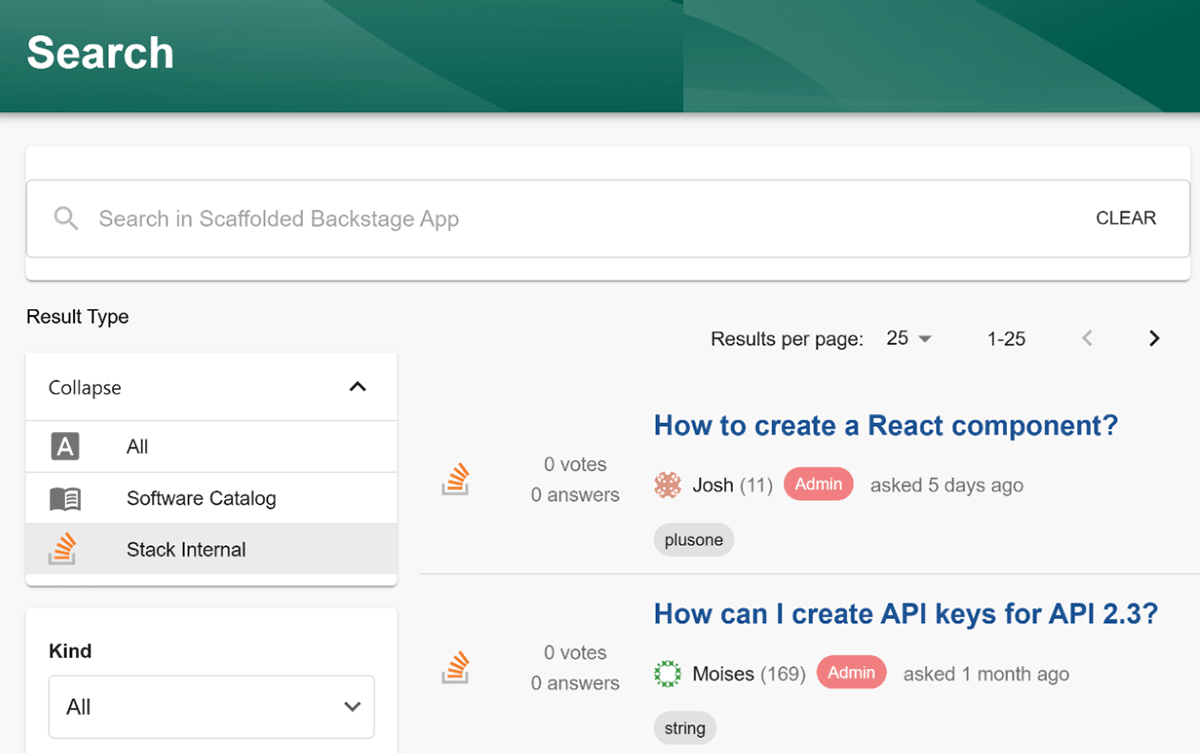
- Add the Stack Internal Community results to the Search accordion.
Locate the <SearchType.Accordion/> component and add the following code snippet to the accordion:
{
  value: 'stack-overflow',
  name: 'Stack Internal Community',
  icon: <StackOverflowIcon />,
},
- Import the
<StackOverflowIcon />component from@backstage-plugin-stack-overflow-teams.

Configuration is complete. Before running the application, ensure all dependencies are installed by running yarn install on the root directory of your Backstage application.
Example SearchPage.tsx code
You can find an example of the SearchPage.tsx used in this article in our Github repository.
Set up the Stack Internal Community hub and question modal
The frontend plugin includes the Stack Internal Community hub (reusable frontend components) and a modal component you can integrate anywhere in your UI. The hub displays top questions, tags, and users. To incorporate this hub into your Backstage frontend, create a new frontend route and place the route's shortcut within the UI. Additionally, you can add the modal component in a convenient location.
Create a frontend route for the plugin
- Navigate to your frontend
App.tsxfile, usually found atpackages/frontend/src. Scroll until you see the<Route />elements. Add a route for the StackOverflowTeamsPage component as follows:
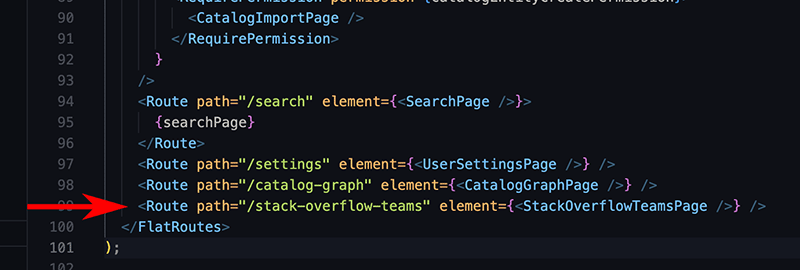
-
Make sure the list item component is imported from the plugin.
-
Create a shortcut for the route (optional). Though not required, we recommend adding this shortcut to the sidebar for convenience.
To add the shortcut, navigate to
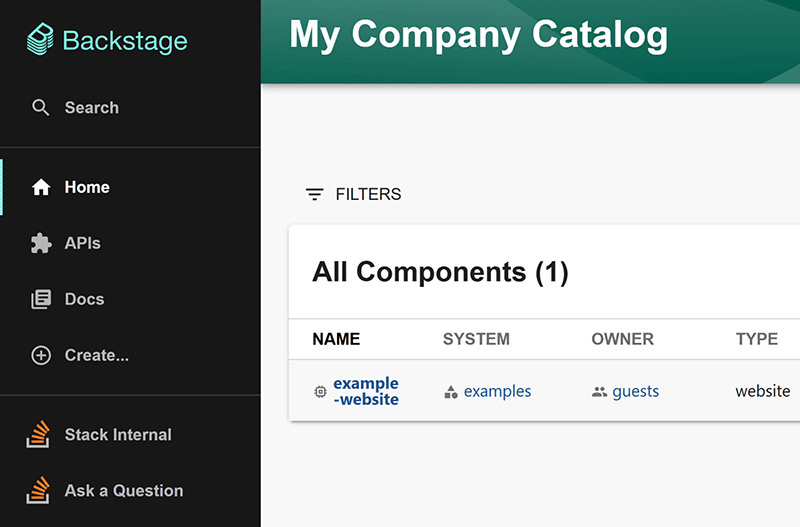
packages/app/src/components/Root.tsx. Scroll down to locate theSidebarItemsection. Here you'll add a new sidebar item with the Stack Internal Community logo. In the UI, clicking the logo will direct users to the route we built earlier.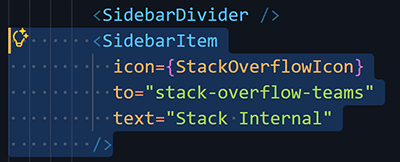
Stack Internal Community Business and Enterprise users can also add the "Ask a Question" modal to the sidebar. This makes the button available from anywhere in the Backstage application.
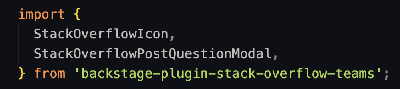
The
<StackOverflowPostQuestionModal />listens to the event "openAskQuestionModal" regardless of where the event is created. Add a newSidebarItemto create that event, and also add the<StackOverflowPostQuestionModal />as seen below:
Get all the resources imported from the plugin:
Install on the New Frontend System
The instructions above cover Backstage's legacy frontend architecture.
If your app is built with createApp from @backstage/frontend-defaults, and registers functionality through features and extensions, you're on Backstage's New Frontend System (NFS) instead. Follow this section.
If your app uses createApp from @backstage/app-defaults with a <FlatRoutes> element tree, you're on the legacy system — follow the instructions above. Nothing in this section applies to you.
The backend setup is identical for both systems. Install and configure the backend plugin, the collator plugin, and the stackoverflow section in app-config.yaml first, per the Backend installation section above.
Install the package
Run the following command from your Backstage root directory:
yarn --cwd packages/app add @stackoverflow/backstage-plugin-stack-overflow-teams
Add the feature
packages/app/src/index.tsx, and import the plugin from its /alpha entry point:
import { createApp } from '@backstage/frontend-defaults';
import stackOverflowTeamsPlugin from '@stackoverflow/backstage-plugin-stack-overflow-teams/alpha';

const app = createApp({
  features: [stackOverflowTeamsPlugin],
});

export default app.createRoot();
Note the /alpha import path. The default entry point for the package is the legacy plugin, and isn't a frontend feature.
If your app discovers features automatically through app.packages configuration, you don't need to change any code. The package gets picked up on its own.
That's the whole installation. Unlike the legacy system, the New Frontend System install needs no Root.tsx edits — don't add sidebar items or route elements by hand. Everything below comes from the plugin.
What you get
Installing the feature adds the following extensions, all enabled by default:
page:stack-overflow-teams— the Stack Internal hub, at/stack-overflow-teams.page:stack-overflow-teams/ask-question— the trigger route for the ask-a-question modal.nav-item:stack-overflow-teams— the "Stack Internal" sidebar item.nav-item:stack-overflow-teams/ask-question— the "Ask a Question" sidebar item.api:stack-overflow-teams— the API client that talks to the backend plugin.search-result-list-item:stack-overflow-teams— renders indexed questions on the search page.search-filter-result-type:stack-overflow-teams— adds "Stack Internal" to the search result type filter.app-root-element:stack-overflow-teams/ask-question-modal— mounts the ask-a-question modal at the app root.
Configuration
Configure extensions under app.extensions in app-config.yaml.
app: extensions: # Serve the hub from a different path - page:stack-overflow-teams: config: path: /stack-internal # Opt out of a sidebar item - nav-item:stack-overflow-teams/ask-question: false
The hub path is also the OAuth redirect target. If you change it, update stackoverflow.redirectUri to match, and update the redirect URI registered on your Stack Internal OAuth application, too. A mismatch between these three values is the most common cause of a failed login.
Open the ask-a-question modal from your own UI
The modal listens for a window event, so you can trigger it from anywhere in your app:
<button onClick={() => window.dispatchEvent(new Event('openAskQuestionModal'))}>
  Ask a question
</button>
Worked example
The packages/app-next folder in our Github repository holds a complete, runnable app on the New Frontend System with the plugin installed. Run it with yarn start:next.
New Frontend System troubleshooting
Route registration never establishes
This happens when a page component renders through a hand-written route:
// Don't do this — it bypasses route registration
<Route path="/stack-overflow-teams" element={<StackOverflowTeamsPage />} />
Add the plugin to features instead. It registers its own routes.
convertLegacyPlugin doesn't expose a routable extension
You don't need it. Import the native plugin from /alpha instead.
No separate callback or authentication route
There isn't one. The hub page detects the ?code= query parameter that the OAuth flow returns, and renders the callback handler itself. Mounting page:stack-overflow-teams is all you need.
HTTP 500 after the authorization redirect
The response body is a fixed, generic string. Check the backend logs for the actual cause, under Failed to exchange code for token.
The usual cause is a redirect_uri mismatch. The token exchange re-sends redirect_uri, and Stack Internal compares it byte-for-byte against the authorize request. Verify these three match:
stackoverflow.redirectUriinapp-config.yaml.- The redirect URI registered on the Stack Internal OAuth application.
- The path the browser actually lands on.
A different HTTP 500 error, clientId and redirectUri are required for authentication, means stackoverflow.clientId or stackoverflow.redirectUri is missing, or failed environment variable substitution.
"AuthenticationError: Missing credentials" from the backend
This means the Backstage identity token isn't attaching, which is an app-level authentication problem rather than a plugin problem. A stale @backstage/core:SignInPage:provider entry in local storage with no live session can cause this. Clear your site data, and sign in again.
UI examples
Below are examples of how the UI should look.
Sidebar
Search page
Run and authenticate the app
Before running the app, ensure all dependencies are correctly installed by running yarn install on the Backstage root directory one last time. After that, run the app and look for any errors.
Stack Internal Community Enterprise authentication
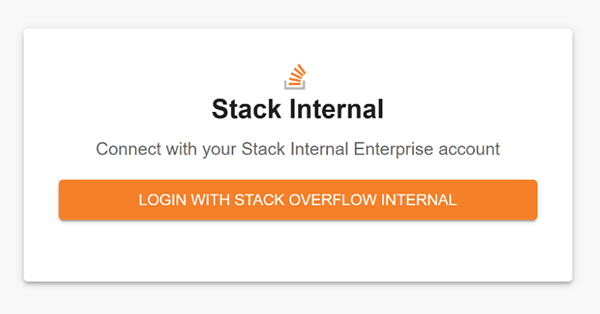
Stack Internal Community Enterprise users can log in using OAuth by clicking LOGIN WITH STACK OVERFLOW INTERNAL.
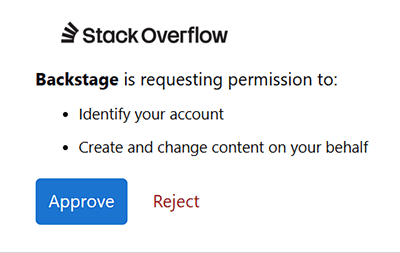
Backstage will redirect you to your Stack Internal Community site. Click Approve to grant Backstage the necessary permissions.
Stack Internal Community Basic and Business authentication
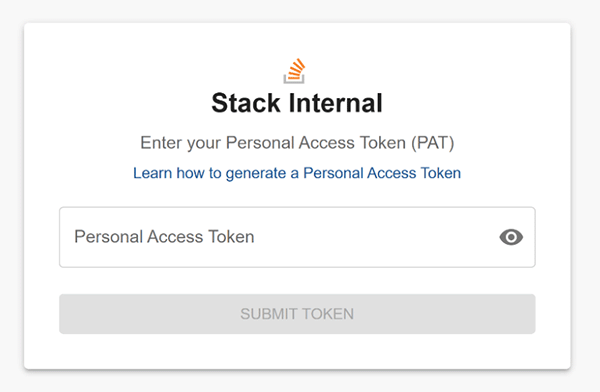
Stack Internal Community Basic and Business users will need to generate an access token by following the steps in the Personal Access Tokens (PATs) for API Authentication article. At the login screen, paste the PAT and click SUBMIT TOKEN. Backstage will store and use the token for subsequent logins.
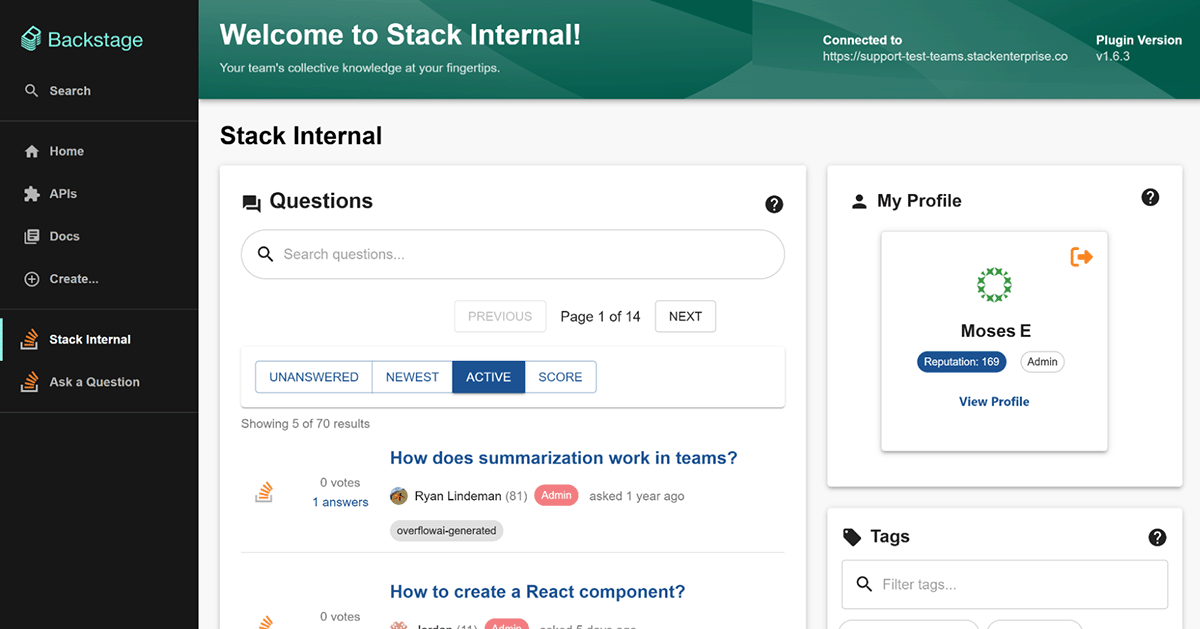
Stack Overflow hub
Once authorized, you should see the Stack Overflow hub.
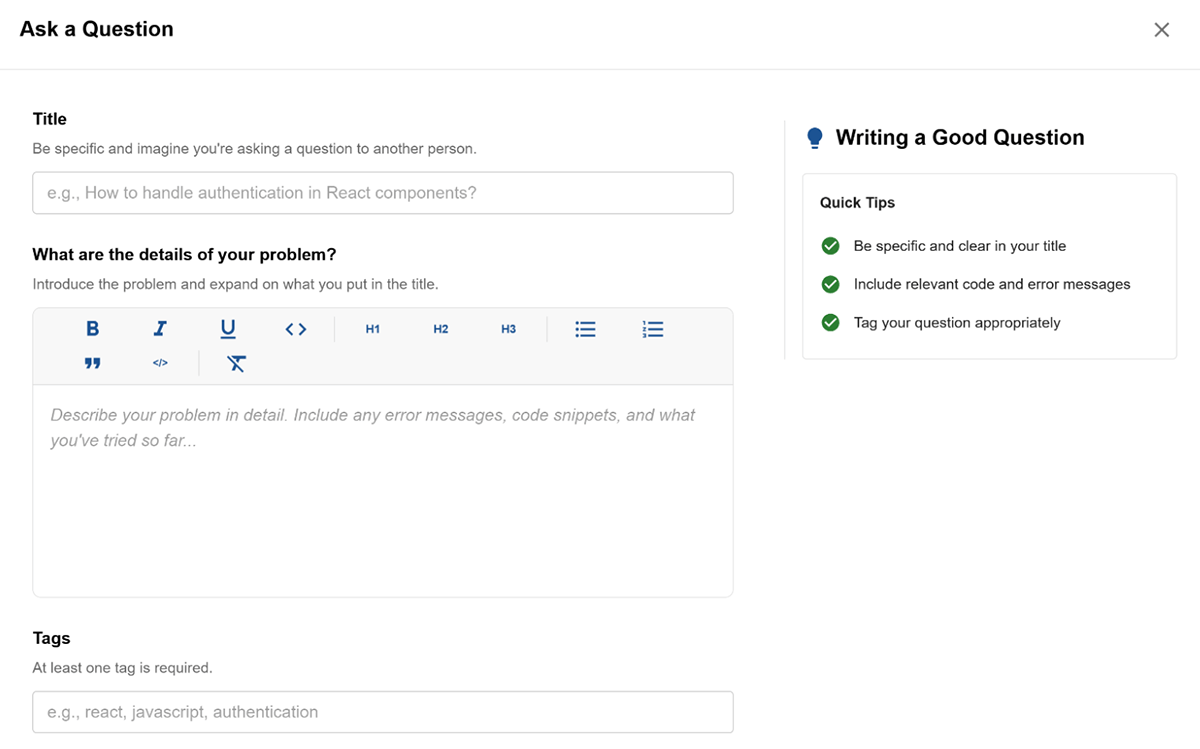
If installed, users should see Ask a Question in the sidebar everywhere in Backstage (Stack Internal Community Business and Enterprise only). Click this to bring up the "Ask a Question" modal.
Troubleshooting and understanding errors
If your Stack Internal Community site has many questions, it can take some time for the collator to build the index. If everything is configured correctly, you should see messages like these in the console:

If the collator plugin runs without error but doesn't receive any data from Stack Internal Community, the application will fail to create the index. If this happens, check for a warning message in the backend console stating that the index for Stack Internal Community was not created.
Verify the configuration file to ensure your Stack Internal Community credentials and other configurations are correct. For more information, refer to the Stack Internal Community API v3 Overview article as well as the collator plugin's config definition file.

If you don't see any warnings or errors, the indexer has successfully received the search data.